Introduction
For this project you’ll be creating an entire web page from a design we’ll provide for you. If you’ve been following along you should have the skills you need to accomplish this, but it may not be easy!
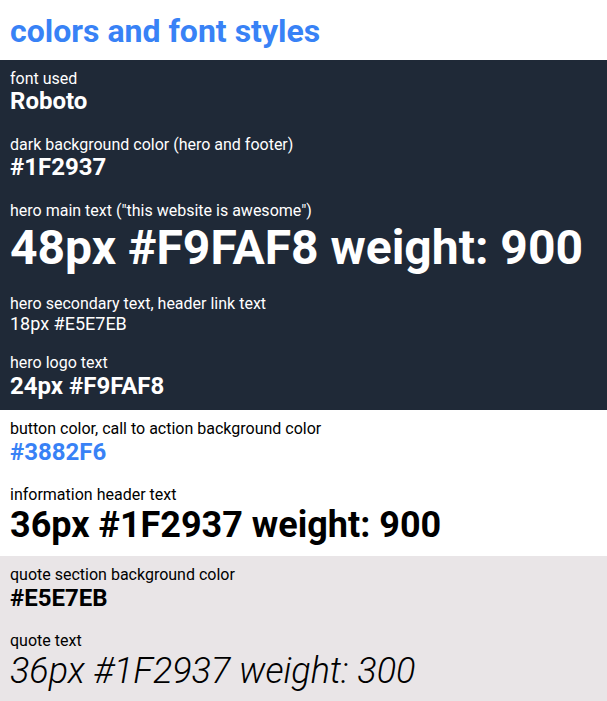
The design we’re providing you comes in the form of 2 images: one is an image of the complete website, and one has some details about some of the fonts and colors we’ve used.
Do not be afraid to use Google or go back to previous lessons to look something up. In real life, professional developers use Google constantly for things that they have been doing for years. At this point it is not expected that you will have everything memorized, so don’t worry about it. Additionally, there are a few small details that you may not have encountered in our lessons yet. This is by design. These details are minor, and easily searched (e.g. Google css rounded corners).
Get your project as close as you can to the design, but do not worry about getting it pixel-perfect. Don’t get out your ruler or count pixels to find the exact margins between the various sections. The point of this assignment is to create something from scratch and get the various elements in more or less the right position relative to the rest. It doesn’t matter if you use margin: 24px when the design actually has margin: 48px.
Finally, feel free to substitute your own content into this design. The images have some meaningless dummy content, but if you want to make up a business and personalize this page, please feel free to do so! Insert actual images in the placeholders, and feel free to play with the colors and fonts a bit too.
A note about images on the web
You do not have the legal right to use just any image that you find on the web. There are many free images to be found, but make sure that the image you use is actually free for you to use, and make sure to credit the creator of the image in your project. An easy way to give credit is to put the creator’s name and contact info in a README file in your repository.
Some good places to find free-to-use images on the web include Pexels, Pixabay, and Unsplash.
Setting up your project’s GitHub repository
As we did in the Recipes project, go ahead and set up a git repository before beginning work on this project. Git and GitHub are going to act as a portfolio for you moving forward, so you need to keep everything in there! Look back at the Recipes project if you need a reminder on how to set it up.
Assignment
Don’t forget to commit early & often! You can reference the Commit Message lesson!
- Download the design images and take a look at what you’re going to be creating here. Image One (Full Design), Image Two (Color and Fonts)
- Hero text is the statement that appears at the top of a web page.
- There are many ways to tackle a project like this, and it can be overwhelming to look at a blank HTML document and not know where to start. Our suggestion: take it one section at a time. The website you’re creating has 4 main sections (and a footer), so pick one and get it into pretty good shape before moving on. Starting at the top is always a solid plan.
- For the section you’re working on, begin by getting all the content onto the page before beginning to style it. In other words, do the HTML and then do the CSS. You’ll probably have to go back to the HTML once you start styling, but bouncing back and forth from the beginning will take more time and may cause more frustration. (Note: you don’t need to use more than one stylesheet. Using only one CSS file is adequate for this project).
- Many of the elements on this page are very similar to things you saw in our flexbox exercises… feel free to go back to those if you need a refresher.
- You do not need to make this project responsive. That means you don’t have to adjust your design for different screen sizes, zoom levels, or mobile devices. For now, just focus on making it look good on a regular computer screen. You’ll learn how to handle different screen sizes later.
- When you finish, don’t forget to push it up to GitHub!
Viewing your project on the web
To share your website with others, you’ll need to deploy it using GitHub Pages. The full instructions for this process can be found in the Recipes project lesson.