Introduction
This lesson will build upon the previous lesson on state and introduce further concepts and techniques to manage state. Let’s dive in.
Lesson overview
This section contains a general overview of topics that you will learn in this lesson.
- How to structure state.
- How state updates.
- Learn about controlled components.
How to structure state
Managing and structuring state effectively is by far one of the most crucial parts of building your application. If not done correctly, it can become a source of bugs and headaches.
The assignment items go through the topic thoroughly, but as a general rule of thumb: don’t put values in state that can be calculated using existing values, state, and/or props.
State should not be mutated
Mutating state is a no-go area in React as it leads to unpredictable results. Primitives are already immutable, but if you are using reference-type values, i.e., arrays and objects, never mutate them. According to the React documentation, we should treat state as if it was immutable. To change state, we should always use the setState function, which in the case of the example below is the setPerson function.
function Person() {
  const [person, setPerson] = useState({ name: "John", age: 100 });

  // BAD - Don't do this!
  const handleIncreaseAge = () => {
    // mutating the current state object
    person.age = person.age + 1;
    setPerson(person);
  };

  // GOOD - Do this!
  const handleIncreaseAge = () => {
    // copy the existing person object into a new object
    // while updating the age property
    const newPerson = { ...person, age: person.age + 1 };
    setPerson(newPerson);
  };

  return (
    <>
      <h1>{person.name}</h1>
      <h2>{person.age}</h2>
      <button onClick={handleIncreaseAge}>Increase age</button>
    </>
  );
}
Objects and arrays in state
In the above example, notice how we create a new object and then copy the existing state values into the new object while providing a new value for age.
That is because if we don’t provide a new object to setState it is not guaranteed to re-render the page. Therefore, we should always provide a new Object for setState to trigger a re-render. setState uses Object.is() to determine if the previous state is the same.
As for nested objects and arrays, state can get tricky fast since you will have to copy the nested items as well. Be careful when using them.
How state updates
State updates are asynchronous. What this implies is that whenever you call the setState function, React will apply the update in the next component render. This concept can take a while to wrap your head around. With a lot of practice, you’ll get the hang of it in no time.
Remember, state variables aren’t reactive; the component is. This can be understood by the fact that calling setState re-renders the entire component instead of just changing the state variable on the fly.
function Person() {
  const [person, setPerson] = useState({ name: "John", age: 100 });

  const handleIncreaseAge = () => {
    console.log("in handleIncreaseAge (before setPerson call): ", person);
    setPerson({ ...person, age: person.age + 1 });
    // we've called setPerson, surely person has updated?
    console.log("in handleIncreaseAge (after setPerson call): ", person);
  };

  // this console.log runs every time the component renders
  // what do you think this will print?
  console.log("during render: ", person);

  return (
    <>
      <h1>{person.name}</h1>
      <h2>{person.age}</h2>
      <button onClick={handleIncreaseAge}>Increase age</button>
    </>
  );
}
These are the logs:
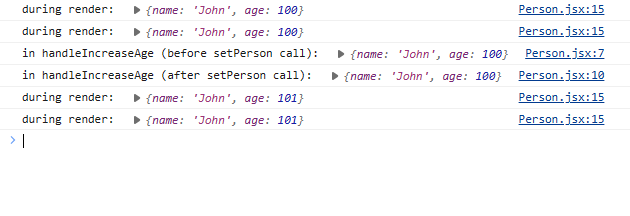
Uh-oh, what is happening? Let’s break it down (ignore the double console.logs for the render case; this is covered in the upcoming lessons).
- The component renders for the first time. The
personstate variable is initialized to{ name: 'John', age: 100 }. The “during render”console.logprints the state variable. - The button is clicked invoking
handleIncreaseAge. Interestingly, theconsole.logbefore and after thesetPersoncall prints the same value. - The component re-renders. The
personstate variable is updated to{ name: 'John', age: 101 }.
The person state stays the same throughout the current render of the component. This is what “state as a snapshot” refers to. The setState call triggers a component re-render, and the person state is updated to the new value.
The unexpected infinite loop
The following would cause an infinite loop, but React can, under certain circumstances, detect infinite re-renders and throw an error. Can you guess why React will throw an error here, warning you about too many re-renders? Drop by in the TOP Discord server, tell us why, and score a brownie point!
function Component() {
  const [count, setCount] = useState(0);

  setCount(count + 1);

  return <h1>{count}</h1>;
}
State updater functions
A trick question. Let’s look at another implementation of handleIncreaseAge; what do you think it does?
const handleIncreaseAge = () => {
  setPerson({ ...person, age: person.age + 1 });
  setPerson({ ...person, age: person.age + 1 });
};
Surely, it will increase the age by 2? Nope. The above code is saying to React:
Hey, replace the current render’s
personwith an increase in age by 1. Then, replace the current render’spersonwith an increase in age by 1.
Notice the word “replace”. When you pass in the value to the setState function, React will replace the current state with the value you passed in. You might be wondering, what if I want to update the state multiple times using the latest state? This is where the state updater function comes in.
const handleIncreaseAge = () => {
  setPerson((prevPerson) => ({ ...prevPerson, age: prevPerson.age + 1 }));
  setPerson((prevPerson) => ({ ...prevPerson, age: prevPerson.age + 1 }));
};
When a callback is passed to the setState function, it ensures that the latest state is passed in as an argument to the callback.
Using an updater is not always necessary. If you want to change the state using your previous state and you prefer consistency over verbosity, then you might consider using an updater.
React batches state updates
There are two setPerson calls in the above example, and from what we’ve learned so far, a setState call triggers a component re-render. So, the component should re-render twice, right? You would say yes, but React is smart. Wherever possible, React batches the state updates. Here, the component only re-renders once. We’d encourage you to use console.logs to verify this.
Controlled components
There are native HTML elements that maintain their own internal state. The input element is a great example. You type into an input and it updates its own value on every keystroke. For many use-cases, you would like to control the value of the input element, i.e., set its value yourself. This is where controlled components come in.
function CustomInput() {
  const [value, setValue] = useState("");

  return (
    <input
      type="text"
      value={value}
      onChange={(event) => setValue(event.target.value)}
    />
  );
}
Instead of letting the input maintain its own state, we define our own state using the useState hook. We then set the value prop of the input to the state variable and update the state variable on every onChange event. Now, every time the user types something in the input, React will ensure you have the latest comment, review, or post (whatever the user was typing) in value.
This pattern is extremely useful wherever you need user input, i.e., typing in a textbox, toggling a checkbox, etc. Contrarily, yes, the input element can be left uncontrolled and access its value through some other method. You don’t need to worry about it yet, as it will be covered later on in the course. For now, control your components!
Assignment
-
Read the following articles from the React documentation:
-
Update the
Personcomponent we’ve been using above.- Add two separate input fields for the first name and the last name. Either of these should be able to update the full name in the
h1element with every keystroke. - There are many ways you can do this. Keep in mind what you’ve learned in this lesson while coding it out.
- Add two separate input fields for the first name and the last name. Either of these should be able to update the full name in the
Knowledge check
The following questions are an opportunity to reflect on key topics in this lesson. If you can’t answer a question, click on it to review the material, but keep in mind you are not expected to memorize or master this knowledge.
- What should you keep in mind while declaring state?
- Why should we always use
setStateto update our state? - What does “state as a snapshot” mean?
- What’s the difference between passing a value vs a callback to the
setStatefunction? - Why should we always provide a new Object to
setState? - Why would you want to control a component?