Introduction
One of the most powerful things a web developer can do is fetching data from a server and displaying it creatively on their site. In many cases, the server solely exists for that specific site. The server could contain blog posts, user data, high scores for a game or anything else. In other cases, the server is an open service that serves data to anyone that wants to use it (i.e. weather data or stock prices). In either case, the methods of accessing and then using that data are essentially the same.
Lesson overview
This section contains a general overview of topics that you will learn in this lesson.
- Explain what an API is.
- Explain broadly how access to an API works.
- Explain how to fetch and extract data from an API.
- Explain why your API request might be blocked by the browser, and how to fix this.
APIs
Servers created to provide functionality and serve data for external use (in websites or apps) often do so using APIs, or ‘Application Programming Interfaces’.
There are multiple ways of requesting data from an API, but all of them basically do the same thing. For the most part, APIs are accessed through URLs, and the specifics of how to query these URLs change based on the specific service you are using. For example, Visual Crossing has a weather API that has several types of data you can request. To get the current weather in a specific location, you can pass in the name of a city into the path of the URL, like so:
https://weather.visualcrossing.com/VisualCrossingWebServices/rest/services/timeline/london
The specifics for using any API are usually documented on the service’s website. Check out the Visual Crossing API Documentation. If you haven’t already, go ahead and paste the weather URL above, with the city of your choice, into your browser… (we’ll wait).
You’ll probably get an error like this:
No API key or session found. Please verify that your API key parameter is correct.
This brings us to another point about APIs. In most cases, you will have to create an account and request an “API key” from the API service before attempting to fetch data from their endpoints (specific URLs that you use to access a particular function or data within the API). Once obtained, an API key will usually have to be included with every data request. With Visual Crossing, that’s as a query string parameter:
https://weather.visualcrossing.com/VisualCrossingWebServices/rest/services/timeline/london?key=11111111111111111
As you can imagine, an API key is random and unique to you. As such, services like Visual Crossing can correlate your API key to your requests of their data, including how much and how often you are requesting it.
Issuing API keys allows an API service to better track abuse of their systems and data. Additionally, it can also be a way for those services to mitigate and recuperate operating costs. Visual Crossing, for example, provides not only a free tier but a variety of paid tiers that can cost up to 150 USD/month! After all, running servers costs money, and APIs are no exception. While a single request to an API might cost a fraction of a penny, imagine using that API to create an amazing weather app that gets used all over the world… you could easily have thousands of people accessing that data every minute! The cost to handle that traffic could quickly balloon up to significant sums for the API service.
As such, you’ll find that most API services, if not all, provide paid tiers that come with the ability to make more frequent requests, or provide access to more information unavailable in lower tiers. For example, Visual Crossing’s free version allows 1000 calls/requests per day with a limited amount of information (albeit sufficient for a pet project). On the other hand, the Enterprise version provides unlimited API calls per month, has Energy data, Maritime data… all those bells and whistles (details about Visual Crossing’s pricing if you’re curious). So, if your app becomes successful and needs additional features, you’ll probably need to pay for a better account.
Because your API key is your key to these services and data, securing them is an important habit, especially if you are using a paid tier. There are plenty of bots that crawl GitHub repositories solely for hardcoded/unsecured API keys, allowing bad agents to then access and utilize the services and data you’ve paid for. In fact, the more eagle-eyed readers may have noticed a problem with the demonstration above: The API key is right there in the URL request. It would not take much for an internet traffic sniffer to pick up on the API key, least of all someone looking over your shoulder!
At this point in the curriculum, though, this point is largely moot. After all, we’re leveraging free access to APIs, and the majority of our apps are only going to be used by us and the people that view our portfolios. Just make a note of the severe limitations of using API keys as demonstrated above for now. Securing API keys requires handling things server-side, and we are only focusing on the frontend concepts here. If you are in the Full Stack JavaScript pathway, the backend will be covered later in the curriculum.
Back to Visual Crossing. Go ahead and create a free Visual Crossing account to obtain an API key. You can find your API key in your account profile page. Once you have your key, try making a new request with the city of your choice, and the API key passed in as query string parameters, like the example above. You’ll hopefully see a proper response, something like:
{"queryCost":1,"latitude":51.5064,"longitude":-0.12721,"resolvedAddress":"London, England, United Kingdom","address":"london","timezone":"Europe/London","tzoffset":1.0,"description":"Similar temperatures continuing with a chance of rain tomorrow, Tuesday & Thursday.","days":[{"datetime":"2024-07-06","datetimeEpoch":1720220400,"tempmax":61.4,"tempmin":53.1,"temp":57.8,"feelslikemax":61.4,"feelslikemin":53.1,"feelslike":57.8,"dew":51.3,"humidity":79.7,"precip":0.457,"precipprob":100.0,"precipcover":75.0,"preciptype":["rain"],"snow":0.0,"snowdepth":0.0,"windgust":35.3,"windspeed":21.9,"winddir":262.6,"pressure":1001.8,"cloudcover":70.5,"visibility":8.3,"solarradiation":147.5,"solarenergy":12.9,"uvindex":6.0,"severerisk":10.0,"sunrise":"04:52:02","sunriseEpoch":1720237922,"sunset":"21:18:20","sunsetEpoch":1720297100,"moonphase":0.02,"conditions":"Rain, Partially cloudy","description":"Partly cloudy throughout the day with a chance of rain throughout the day.","icon":"rain","stations":["EGWU","EGLL","D5621","EGLC"]}]}
(This preview above is just the tip of the iceberg, the actual response is a lot longer!)
Visual Crossing’s query builder
Curious how to construct queries? Check out Visual Crossing’s query builder! This will help you build a query with the region as the only input. Play around with the location and query options. Neat, isn’t it? The output uses the “Grid” tab, but our query is in the “API” tab, and we want to learn how the query was structured. Click on the “API” tab and it will show the query that led to the grid format you just saw.
Congratulations on making your first API request!
Fetching data
So how do we actually get the data from an API into our code?
A couple of years ago the main way to access API data in your code was using an XMLHttpRequest. This function still works in all browsers, but unfortunately, it is not particularly nice to use. The syntax looks something like this:
// Just getting XHR is a mess!
if (window.XMLHttpRequest) { // Mozilla, Safari, ...
  request = new XMLHttpRequest();
} else if (window.ActiveXObject) { // IE
  try {
    request = new ActiveXObject('Msxml2.XMLHTTP');
  }
  catch (e) {
    try {
      request = new ActiveXObject('Microsoft.XMLHTTP');
    }
    catch (e) {}
  }
}

// Open, send.
request.open('GET', 'https://url.com/some/url', true);
request.send(null);
Ouch. That was painful.
Developers, feeling the pain of having to write that stuff out, began writing 3rd party libraries to take care of this and make it much easier to use. Some of the more popular libraries are axios and superagent, both of which have their strengths and weaknesses.
More recently, however, web browsers have begun to implement a new native function for making HTTP requests, and that’s the one we’re going to use and stick with for now. Meet fetch:
// URL (required), options (optional)
fetch('https://url.com/some/url')
  .then(function(response) {
    // Successful response :)
  })
  .catch(function(err) {
    // Error :(
  });
In case you’ve forgotten, scroll back up and look at how you would use XHR to do the same thing. While you’re admiring how nice and clean that code is, notice the .then() and .catch() functions there. Do you remember what those are? (PROMISES!)
Let’s change up our API for this example. We’re going to walk through an example using fetch with the giphy API to display a random gif on a webpage. The API requires you sign up to giphy and get a free API key.
Giphy has several methods for searching and finding GIFs which you can read about in their documentation. Today we’re just going to use the ‘translate’ endpoint because it’s the simplest one for our purposes. You can find the appropriate URL in their documentation by scrolling down to the translate endpoint information from Giphy. What it tells us is that the correct URL is api.giphy.com/v1/gifs/translate and that it requires 2 parameters, your api_key and a search term. If you put it all together correctly (with YOUR API key) you should get something like this:
'https://api.giphy.com/v1/gifs/translate?api_key=YOUR_KEY_HERE&s=cats'
// of course we're searching for cats
Go ahead and try that URL (with YOUR API key) in a browser. If everything goes well you should get a relatively long string of data and no errors.
Let’s do this
For now, we’re going to keep all of this in a single HTML file. So go ahead and create one with a single blank image tag and an empty script tag in the body.
<!DOCTYPE html>
<html lang="en">
<head>
  <meta charset="UTF-8">
  <title>Document</title>
</head>
<body>
  <img src="#">
  <script>
  </script>
</body>
</html>
In the script tag, let’s start by selecting the image element and assigning it to a variable so that we can change the URL once we’ve received it from the Giphy API.
<script>
  const img = document.querySelector('img');
</script>
Adding fetch with our URL from above is also relatively easy:
<script>
  const img = document.querySelector('img');
  fetch('https://api.giphy.com/v1/gifs/translate?api_key=YOUR_KEY_HERE&s=cats')
    .then(function(response) {
      console.log(response.json());
    });
</script>
You should now be able to open the HTML file in your browser, and while you won’t see anything on the page, you should have something logged in the console. The trickiest part of this whole process is deciphering how to get to the data you desire from the server’s response. In this case, inspecting the browser’s console will reveal that what’s being returned is another Promise… to get the data we need another .then() function.
<script>
  const img = document.querySelector('img');
  fetch('https://api.giphy.com/v1/gifs/translate?api_key=YOUR_KEY_HERE&s=cats')
    .then(function(response) {
      return response.json();
    })
    .then(function(response) {
      console.log(response);
    });
</script>
Now we have a JavaScript object and if you inspect it closely enough you’ll find that the data we need (an image URL) is nested rather deeply inside the object:
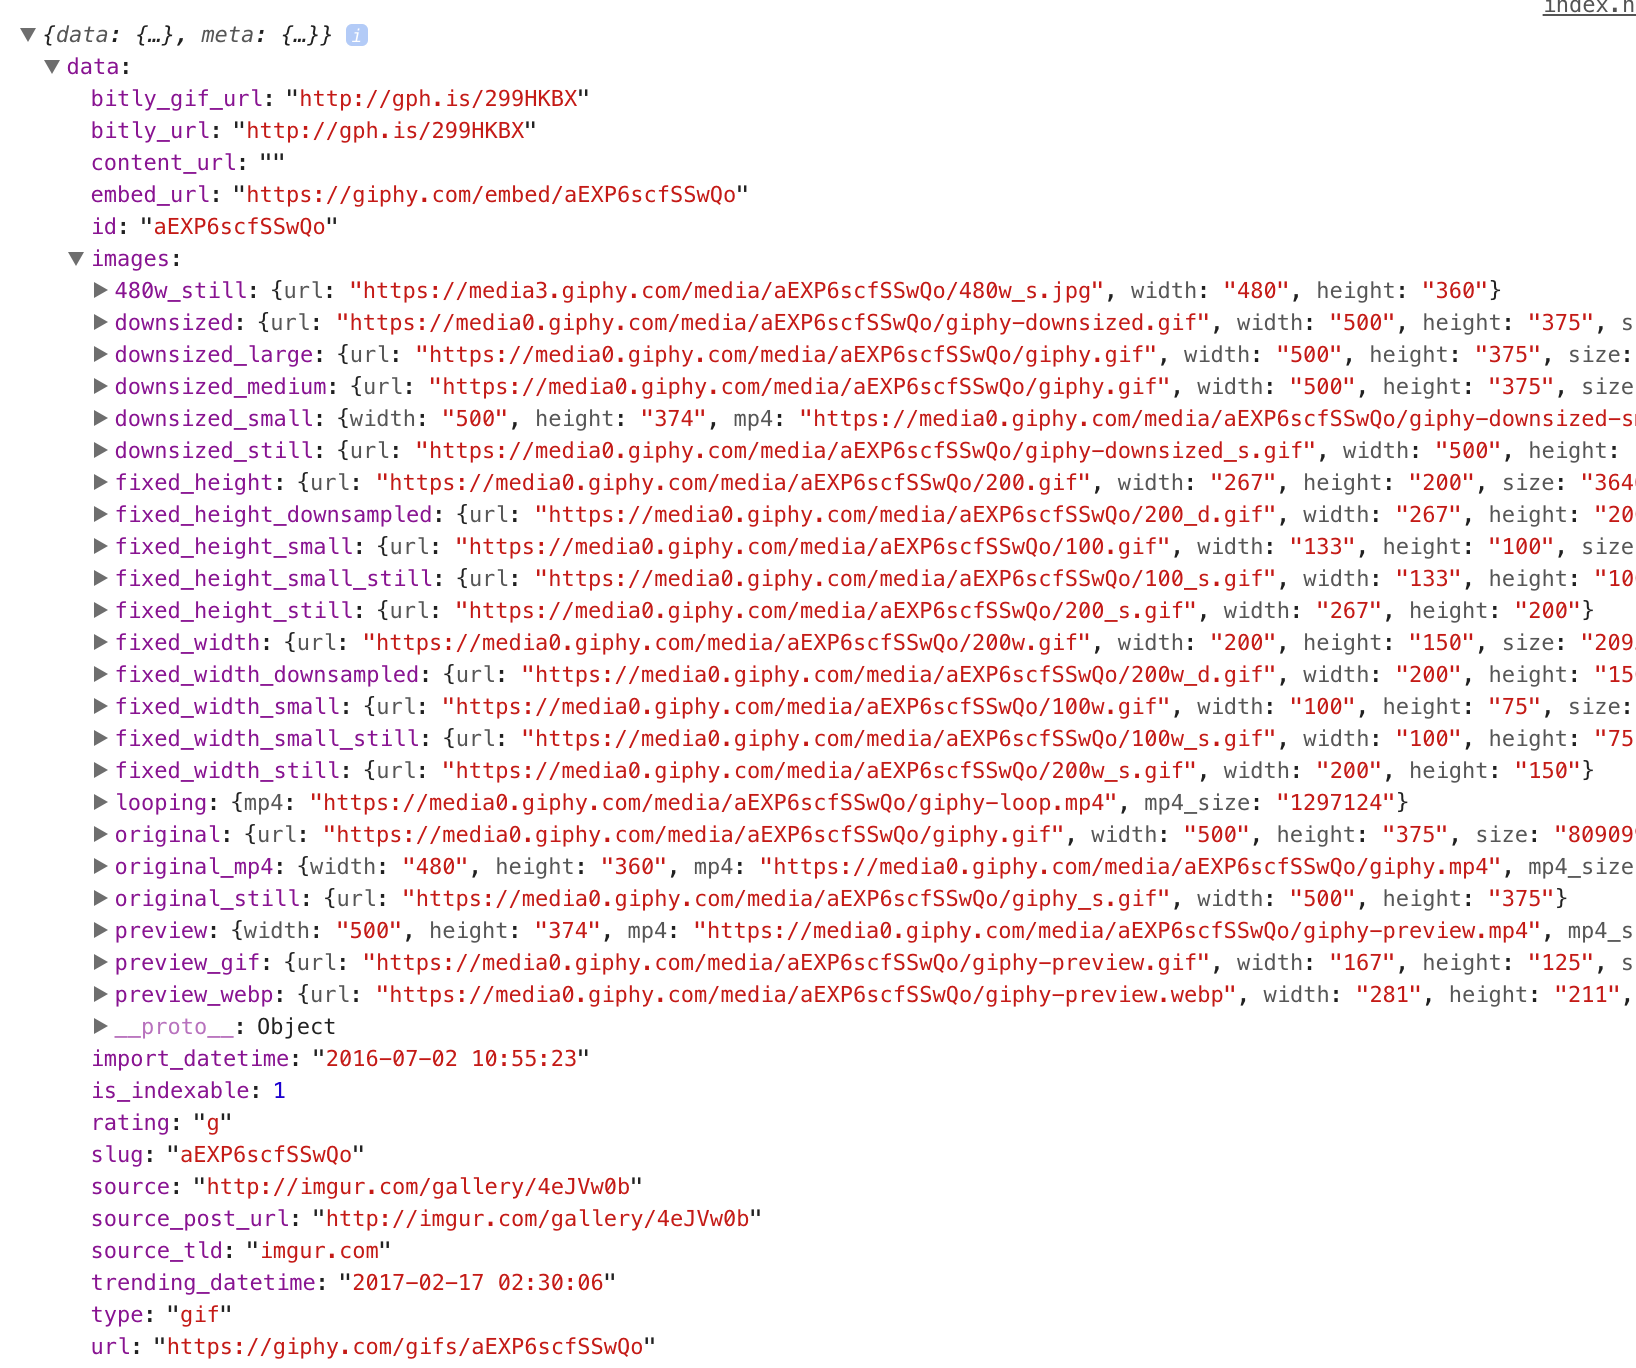
To get to the data we need to drill down through the layers of the object until we find what we want!
<script>
  const img = document.querySelector('img');
  fetch('https://api.giphy.com/v1/gifs/translate?api_key=YOUR_KEY_HERE&s=cats')
    .then(function(response) {
      return response.json();
    })
    .then(function(response) {
      console.log(response.data.images.original.url);
    });
</script>
Running the file should now log the URL of the image. All that’s left to do is set the source of the image that’s on the page to the URL we’ve just accessed:
<script>
  const img = document.querySelector('img');
  fetch('https://api.giphy.com/v1/gifs/translate?api_key=YOUR_KEY_HERE&s=cats')
    .then(function(response) {
      return response.json();
    })
    .then(function(response) {
      img.src = response.data.images.original.url;
    });
</script>
If all goes well, you should see a new image on the page every time you refresh!
If you’ve gotten lost along the way, check out this jsbin project demonstrating fetching from giphy. Besides the glorious styling, this is what your version should look like.
While we are pushing this API key to the frontend, this isn’t something you should do with any key that is not free. Keys used on the client-side are considered public knowledge, so caution must be taken with sensitive and non-free keys. Handling keys without pushing them to the frontend will be taught in later sections if you haven’t already learned it in the Ruby course.
Assignment
- Check out this list of Public APIs and let your imagination go wild.
- Expand on our little project here by adding a button that fetches a new image without refreshing the page.
-
Add a search box so users can search for specific gifs. You should also investigate adding a
.catch()to manage some errors (e.g. invalid URL). Keep in mind that if the API responds, even with something like a404 Not Foundor some other non-2XX status response, that is still a valid response andfetchwill therefore not throw an error, meaning the.catch()will not run. It may still end up running if your following JavaScript code throws an error, such as trying to access a property ofundefined, or even if you manually throw an error yourself.If you want to conditionally handle any situations where the API does not give you the desired response (e.g. a
404 Not Foundor similar), you will need to do this manually in your.then(). Check out MDN’s docs for the Response object for some useful properties.
Knowledge check
The following questions are an opportunity to reflect on key topics in this lesson. If you can’t answer a question, click on it to review the material, but keep in mind you are not expected to memorize or master this knowledge.