Introduction
Now that you understand the basic syntax of HTML and CSS, we’re going to get serious. The most important skills you need to master with CSS are positioning and layout. Changing fonts and colors is a crucial skill, but being able to put things exactly where you want them on a webpage is even more crucial. After all, how many webpages can you find where absolutely every element is just stacked one on top of another?
Learning to position elements on a webpage is not that difficult once you understand just a few key concepts. Unfortunately, many learners race through learning HTML and CSS to get to JavaScript and end up missing these fundamental concepts. This leads to frustration and pain (and funny gifs) because all the JavaScript skills in the world are meaningless if you can’t stick your elements on the page where you need them to be. So with that in mind, let’s get started.
Lesson overview
This section contains a general overview of topics that you will learn in this lesson.
- You’ll learn all about the box model.
- You’ll learn how to make sure elements are just the right size with
margin,padding, andborders.
The box model
The first important concept that you need to understand to be successful in CSS is the box model. It isn’t complicated, but skipping over it now would cause you much frustration down the line.
Every single thing on a webpage is a rectangular box. These boxes can have other boxes in them and can sit alongside one another. You can get a rough idea of how this works by applying an outline to every element on the page like this:
* {
  outline: 2px solid red;
}

You can use the browser’s inspector to add the CSS above to this web page if you want, by clicking the + button in the top right of the “Styles” panel within the “Elements” tab. Boxes in boxes!
OK, so there might be some circles in the above image… but when it comes to layout, they fit together like rectangular boxes and not circles. In the end, laying out a webpage and positioning all its elements is deciding how you are going to nest and stack these boxes.
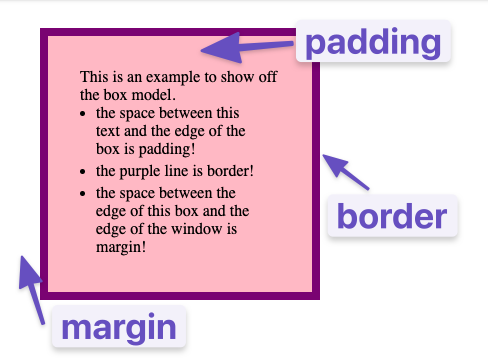
The only real complication here is that there are many ways to manipulate the size of these boxes, and the space between them, using padding, border, and margin. The assigned articles go into more depth on this concept, but to sum it up briefly:
paddingincreases the space between the border of a box and the content of the box.borderadds space (even if it’s only a pixel or two) between the margin and the padding.marginincreases the space between the borders of a box and the borders of adjacent boxes.
Be sure to study the diagrams carefully.
Assignment
- Learn CSS Box Model In 8 Minutes is a straightforward overview of the box model, padding and margin. Go ahead and watch this now; it informs everything else.
- box-sizing: border-box (EASY!) is an add-on to the above resource with a better explanation of ‘box-sizing’.
-
Because the box model concept is so incredibly fundamental, let’s dig a bit deeper with MDN’s lesson on the box model. It covers the same material as the video(s) above and will introduce you to inline boxes that we will explore in the next lesson. The article also mentions inner and outer display types when explaining how elements are rendered.
You don’t need to fully understand or memorize those details yet. Pay close attention to the examples and take the time to experiment with their in-browser editor!
- The CSS Tricks page on margins has some further information about the
marginproperty that you’ll find useful. Specifically, the sections aboutautoand margin collapsing contain things you’ll want to know.
Knowledge check
The following questions are an opportunity to reflect on key topics in this lesson. If you can’t answer a question, click on it to review the material, but keep in mind you are not expected to memorize or master this knowledge.
- From inside to outside, what is the order of box-model properties?
- What does the
box-sizingCSS property do? - What is the difference between the standard and alternative box model?
- Would you use
marginorpaddingto create more space between 2 elements? - Would you use
marginorpaddingto create more space between the contents of an element and its border? - Would you use
marginorpaddingif you wanted two elements to overlap each other? - How do you set the alternative box model for all of your elements?
- How do you center an element horizontally?