Introduction
Now that we can manipulate the DOM, it’s time to revisit Rock Paper Scissors and add a UI to it.
Before you start making changes to your Rock Paper Scissors project, you need to learn about a concept in Git called branching so that you can make your changes without having to worry about breaking what you have now.
Branches in Git allow your repository to hold multiple alternate reality versions of your files at the same time. You’ve actually (sort of) been using branches since you made your first commit, you just might not have known it! Back in the setting up Git lesson when you ran git config --global init.defaultBranch main you were setting the name of what’s called the default branch for your repos. The default branch is just what we call the branch that is created when you make your first commit on a project, and in that command we set the name to be main as is the current standard.
Like the branches in a tree (hence the name), all of the branches for a project stem off of a “trunk” (the main branch) or off of other branches.
When you make commits on a specific branch, those changes only exist on that branch, leaving all of your other branches exactly as they were when you branched off of them.
This means that you can keep your main branch as a place for only finished features that you know are working properly, and add each feature to your project using dedicated branches which we call feature branches.
Lesson overview
This section contains a general overview of topics that you will learn in this lesson.
- How to create a new branch.
- How to merge branches.
- Best practices and use cases of branches.
Using branches
You can make new branches by using the command git branch <branch_name>. You can then change to your new branch using git checkout <branch_name>. You can also create a new branch and change to it in a single command by using the -b flag with checkout, in the form git checkout -b <branch_name>.
You can see all of your current branches using git branch with no other arguments. The branch that you’re currently on will be indicated with an asterisk. If you want to change back to main from any other branch, you can do so just like changing to any other branch using git checkout main.
Once you are done working on your feature branch and are ready to bring the commits that you’ve made on it to your main branch, you will need to perform what is known as a merge.
Merges are done by using the command git merge <branch_name> which will take the changes you’ve committed in branch_name and add them to the branch that you’re currently on. You can see an example of a develop branch being created, committed to, and then merged to main in the diagram below.
---
title: Example of Git Branching
---
gitGraph
   commit id: "commit1"
   commit id: "commit2"
   branch develop
   checkout develop
   commit id: "commit1a"
   commit id: "commit2a"
   checkout main
   merge develop id: "merge to main"
Sometimes, the same lines in a file will have been changed by two different branches. When this happens, you will have a merge conflict when you try and merge those branches together. In order to finish merging the branches you will have to first resolve the conflict, which will be covered in a future lesson.
When you don’t need a branch anymore, it can be deleted using git branch -d <branch_name> if the branch has already been merged into main, or with git branch -D <branch_name> if it hasn’t. You will usually want to delete branches when you’re done with them, otherwise they can pile up and make it more difficult to find the branch you’re looking for when you need it.
Sharing code
Another great use case for branches is to share code with others that you might not want to commit to your main branch (or feature branch) at all.
For example: if you have a bug in a new feature you’re working on that you can’t figure out, and it causes your code to break, you don’t want to commit that broken code and have it in your project’s “permanent record”. You could instead create a new temporary branch, switch to it and commit your code to this new branch. If you then push this new temporary branch to GitHub you can share it with others that may be able to help solve your problem. In the assignment below you will get some hands-on practice on making new branches.
Assignment
Warm up
- Let’s practice a little bit of branching first. This interactive Git branching visualizer by Peter Cottle is brilliant. Complete only levels 1-3 of the “Introduction Sequence”.
Adding a UI to Rock Paper Scissors
- Set up a new branch on your previous Rock Paper Scissors repo
- Since we’ll be making a UI for our Rock Paper Scissors game, make a new branch and change to it with the command
git checkout -b rps-ui. -
You are now working in the
rps-uibranch, locally. However, this branch does not exist in your remote repo yet. If you go to your github repo page, you’ll see that you only have 1 branch, which would bemain. Let’s push this new branch to your remote repo with the commandgit push origin rps-ui. Now, you’ll see two branches in your GitHub repository! You can select the new branch on GitHub using the dropdown branch selector shown in the screenshot below.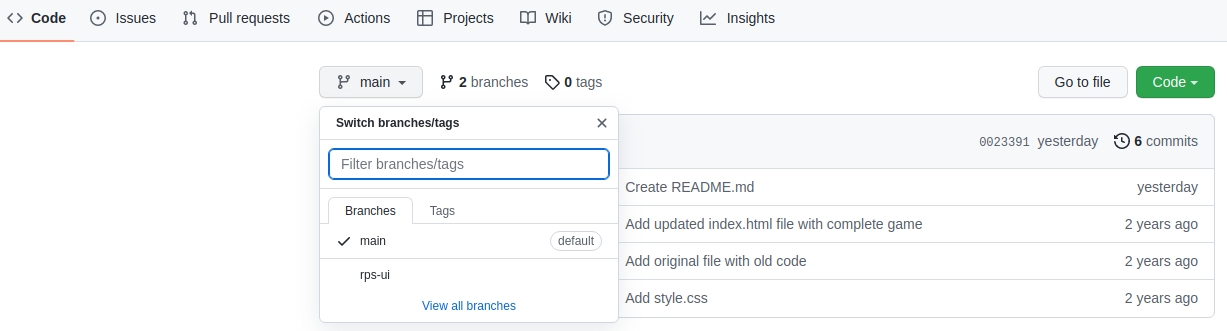
- Make sure you are on the
rps-uibranch. You can check this, with thegit branchcommand. The branch you are currently on will have an (*)asterisk next to it. If you’re in another branch for some reason, change torps-uiwith the commandgit checkout rps-ui. Now you’re all set to work on your new feature! Note: You can add files, commit to this branch, and push changes to your repo, just like you would with the main branch. Everything is the same except when you push the changes, you’d usegit push origin rps-uiinstead ofgit push origin main, since we’re pushing to our new branch.
- Since we’ll be making a UI for our Rock Paper Scissors game, make a new branch and change to it with the command
- In our UI, the player should be able to play the game by clicking on buttons rather than typing their answer in a prompt.
- For now, remove the logic that plays exactly five rounds.
- Create three buttons, one for each selection. Add an event listener to the buttons that call your
playRoundfunction with the correctplayerSelectionevery time a button is clicked. (you can keep theconsole.logs for this step) - Add a
divfor displaying results and change all of yourconsole.logs into DOM methods. - Display the running score, and announce a winner of the game once one player reaches 5 points.
- You will likely have to refactor (rework/rewrite) your original code to make it work for this. That’s OK! Reworking old code is an important part of a programmer’s life.
- Once you’re all done with your UI and made sure everything’s satisfactory, ensure all of your changes are committed to the
rps-uibranch withgit statusbefore continuing. - Now let’s take a look at how we can merge the changes from our
rps-uibranch back to ourmainbranch.- Checkout the branch we want to merge INTO i.e.
mainwith the commandgit checkout main. - Now let’s merge our
rps-uibranch intomain, our current branch, withgit merge rps-ui. - If everything goes fine, our
rps-uibranch is now successfully merged with main! Usegit logand you’ll see all the commits you’ve made to your feature branch on top of the commits you made to the main branch. Now for our final step! - Let’s push our
mainbranch into our remote repo by runninggit push origin main. Go to your GitHub repo and you’ll see that ourmainbranch will have all the changes and commits you made to therps-uibranch. Congratulations! You’ve successfully pushed your first feature into your production branch! - Now that we have all our code in the main branch, we don’t really need our
rps-uibranch anymore. Let’s do some cleanup, both locally and in the remote repo. Delete the branch from our local repo withgit branch -d rps-uiand also delete it from the remote repo on GitHub withgit push origin --delete rps-ui. Congrats, we’re all done with our cleanup!
- Checkout the branch we want to merge INTO i.e.
- Make sure to publish the project on GitHub Pages and add a live preview link in the project lesson.
Knowledge check
The following questions are an opportunity to reflect on key topics in this lesson. If you can’t answer a question, click on it to review the material, but keep in mind you are not expected to memorize or master this knowledge.