Introduction
If you are already using MacOS, Ubuntu, or an official flavor of Ubuntu as your operating system and have Google Chrome as an installed browser, you can skip this lesson. Otherwise, click on the small arrow to the left of the method you would like to use below to expand that section, and then follow the installation instructions.
Be mindful of the OS you are using
We can only support the operating systems indicated above. Our instructions have been tested with MacOS, Ubuntu, and official flavors of Ubuntu. We do not recommend installing an OS that is only based on Ubuntu (like Mint, Pop!_OS, ElementaryOS, etc).
Lesson overview
This section contains a general overview of topics that you will learn in this lesson.
- How to set up a proper environment to follow The Odin Project curriculum.
- Installing Google Chrome in your environment.
Assignment
- If you’re not already running a supported environment, decide on which environment you’re going to set up.
- Look through the instructions so you know what to expect.
- Choose and follow one of the instructions below.
- After you have your environment sorted, proceed to the Google Chrome installation instructions.
OS installation
Unsupported hardware and software
This curriculum only supports using a laptop, desktop or supported Chromebook. We cannot help you set up a developer environment on a RaspberryPi or any other device. You only need to follow one of these sets of instructions if you are not already using MacOS, Ubuntu, or an official flavor of Ubuntu as your operating system.
If you are already using supported hardware and software, you can skip straight to Google Chrome installation below.
Pick your method of installation below:
Virtual Machine (Recommended)
Installing a Virtual Machine (VM) is the easiest and most reliable way to get started creating an environment for web development. A VM is an entire computer emulation that runs inside your current Operating System (OS), like Windows. The main drawback of a VM is that it can be slow because you’re essentially running two computers at the same time. We’ll do a few things to improve its performance.
Step 1: Download VirtualBox and Xubuntu
Installing a VM is a straightforward process. This guide uses Oracle’s VirtualBox program to create and run the VM. This program is open-source, free, and easy to use. What more can you ask for? Now, let’s make sure we have everything downloaded and ready for installation.
Use only your VM for The Odin Project
Once you have completed these instructions, you are expected to work entirely in the VM. Maximize the window, add more virtual monitors if you have them, fire up the Internet Browser in the Whisker Menu ![]() on the top left of the desktop. You should not be using anything outside of the VM while working on The Odin Project. If you feel like you have a good understanding after using the VM for a while, and or want to improve your experience, we recommend dual-booting Ubuntu, which there are instructions for below.
on the top left of the desktop. You should not be using anything outside of the VM while working on The Odin Project. If you feel like you have a good understanding after using the VM for a while, and or want to improve your experience, we recommend dual-booting Ubuntu, which there are instructions for below.
Step 1.1: Download VirtualBox
Download VirtualBox for Windows hosts.
Step 1.2: Download Xubuntu
There are thousands of distributions of Linux out there, but Xubuntu is undoubtedly one of the most popular and user friendly. When installing Linux on a VM, we recommend downloading Xubuntu. There are a few files listed here, download the one ending in .iso. Xubuntu uses the same base software as Ubuntu but has a desktop environment that requires fewer computer resources and is therefore ideal for virtual machines. If you find the download speed slow, you can download the Xubuntu .iso directly from the official Ubuntu image server, as the previous link points to a US-based server. If you reach the download page and are unsure about what version to choose, it is recommended that you pick the Long-Term Support (LTS) version 22.04 (Jammy Jellyfish). You may be tempted to choose a more recent release, but this version is tried and tested by the Odin Project community and therefore the most reliable option for the purposes of this curriculum.
Step 2: Install VirtualBox and set up Xubuntu
Step 2.1: Install VirtualBox
Installing VirtualBox is very straightforward. It doesn’t require much technical knowledge and is the same process as installing any other program on your Windows computer. Double clicking the downloaded VirtualBox file will start the installation process. If you receive an error about needing Microsoft Visual C++ 2019 Redistributable Package, you can find it on the official Microsoft Learn page. You most likely want the version with X64 Architecture (that means 64-bit) - download and install it then try installing VirtualBox again.
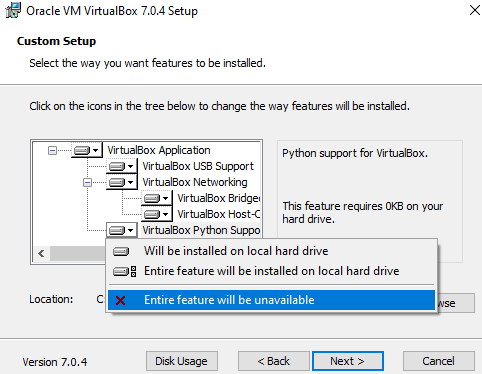
During the installation, you’ll be presented with various options. We suggest dropping the Python Support as you don’t need it by clicking on the drive icon with an arrow and choosing Entire feature will be unavailable:
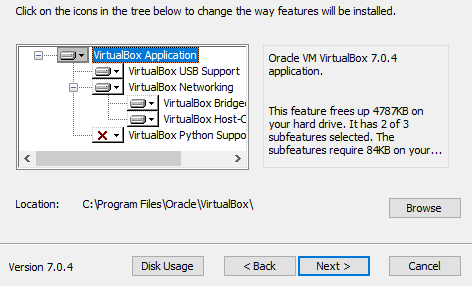
This is how your installation window should look like after turning it off:
Make sure you install the application on C: drive, as it has tendency to error out otherwise. The virtual machine itself can be installed anywhere but we’ll get to that soon.
As the software installs, the progress bar might appear to be stuck; just wait for it to finish.
Step 2.2: Prepare VirtualBox for Xubuntu
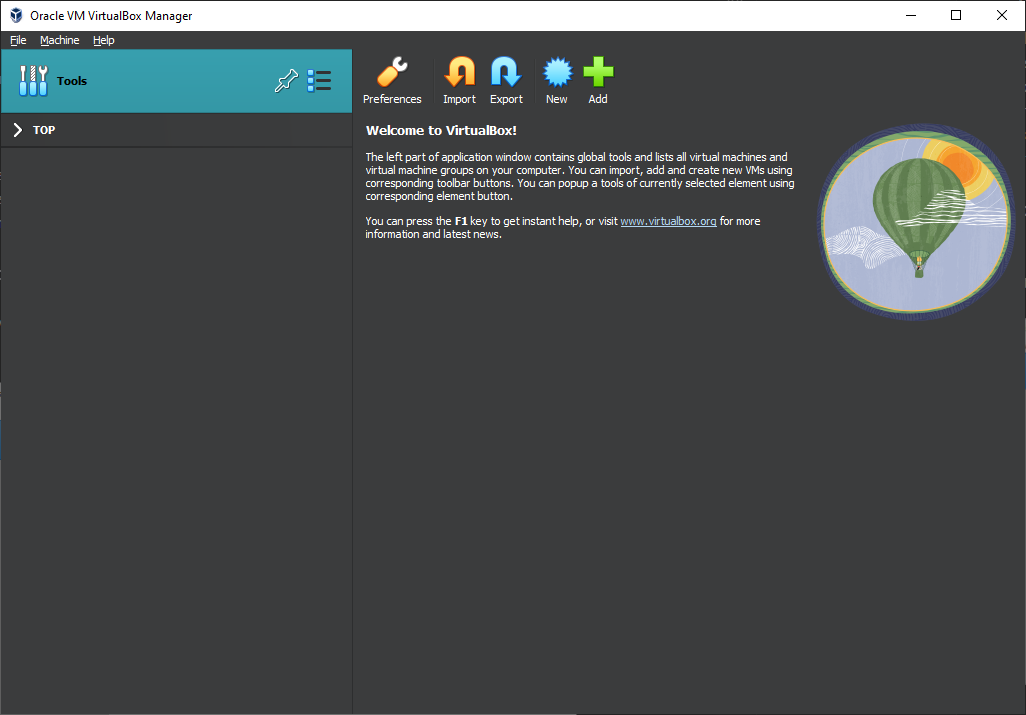
Now that you have VirtualBox installed, launch the program. Once open, you should see the start screen.
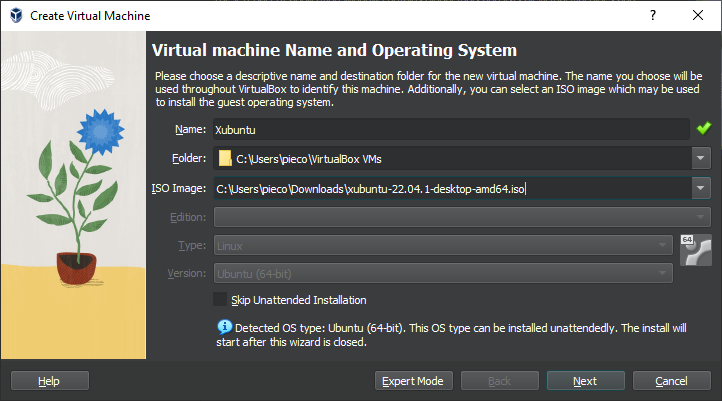
Click on the New button to create a virtual operating system. Give it a name of Xubuntu, if you want the VM installed somewhere else than default C: location, change that accordingly in the Folder option. This is the place where your virtual disk will reside, so make sure that you’ve got at least 30GB for that. In ISO Image choose Other - you’ll see a window open for you to find the .iso file on your PC. It most likely is in the Downloads folder. Leave Skip Unattended Installation as it is.
Continue by pressing Next and follow the next steps:
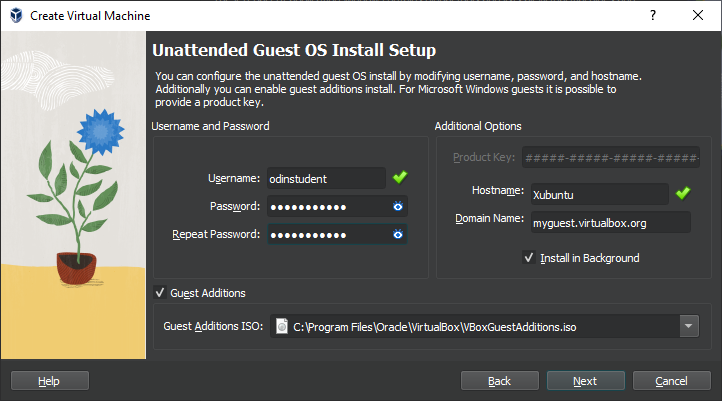
Step 2.2.1: Unattended guest OS install setup
You should see a window like this one now:
You want to tick the Guest Additions and Install in Background options and also change your Username and Password fields to your liking. Note that your username must be all lower-case and no more than 32 characters. If you forget to change the default password, it will be changeme. Leave the Guest Additions ISO, Hostname and Domain Name as they are. Continue by pressing Next.
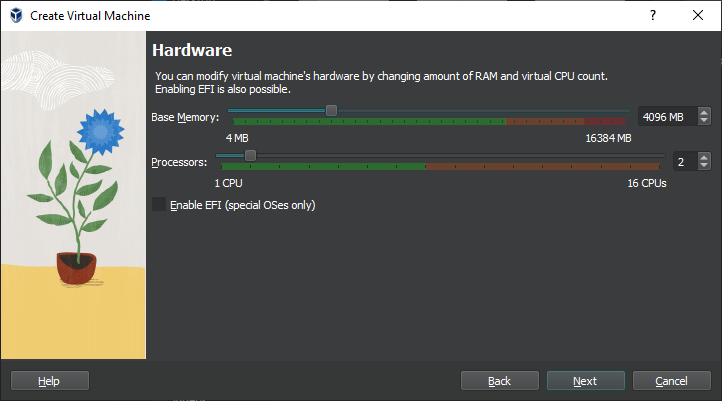
Step 2.2.2: Hardware
In the Hardware section of the installation you want to set your Base Memory to at least 2048 MB or more if possible - the upper limit is half of your total RAM but 4096 MB with the settings we recommend should give you a smooth experience.
For example, if you have 8 GB (8192 MB respectively) of RAM, you could allocate up to 4096 MB (1024 MB to 1 GB) to your VM’s operating system. You can Google how to find out how much RAM you have available if you do not know this already. If the VM runs a bit slow, try allocating more memory!
Converting gigabytes to megabytes
Difficulty converting your Gigabytes (GB) into Megabytes (MB)? 1 GB of RAM is equal to 1024 MB. Therefore, you can say that 8 GB = 8 x 1024 = 8192 MB.
As for Processors you want this to be at 2 and no more. Leave Enable EFI (special OSes only) as it is - that is unchecked - and click Next to continue.
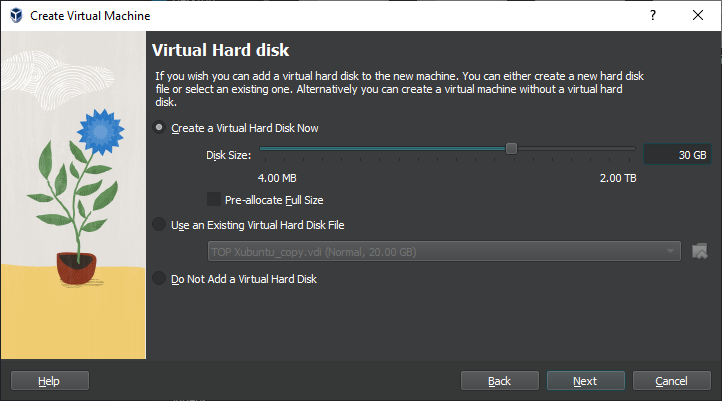
Step 2.2.3: Virtual hard disk
Now, you want to leave all the settings as they are besides the Disk Size, we recommend giving the VM at least 30GB of space. Reminder that this disk will be created in the folder that you’ve specified on the very first step of the VM creation process but nonetheless, the disk can be moved and resized in the future if needed.
Step 2.2.4: Begin the unattended installation
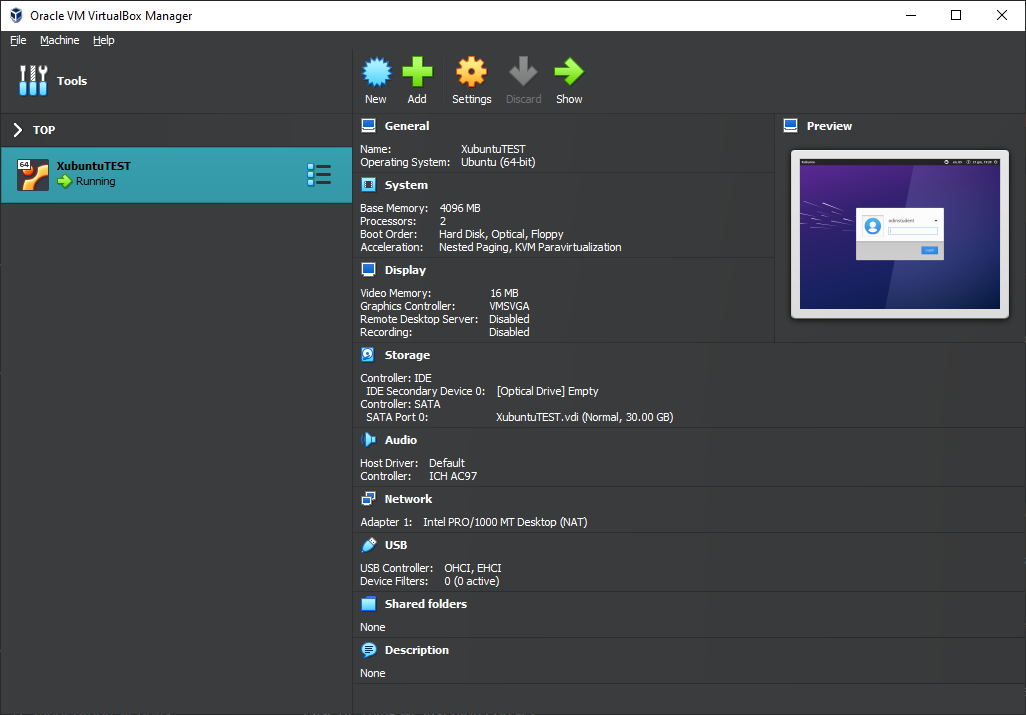
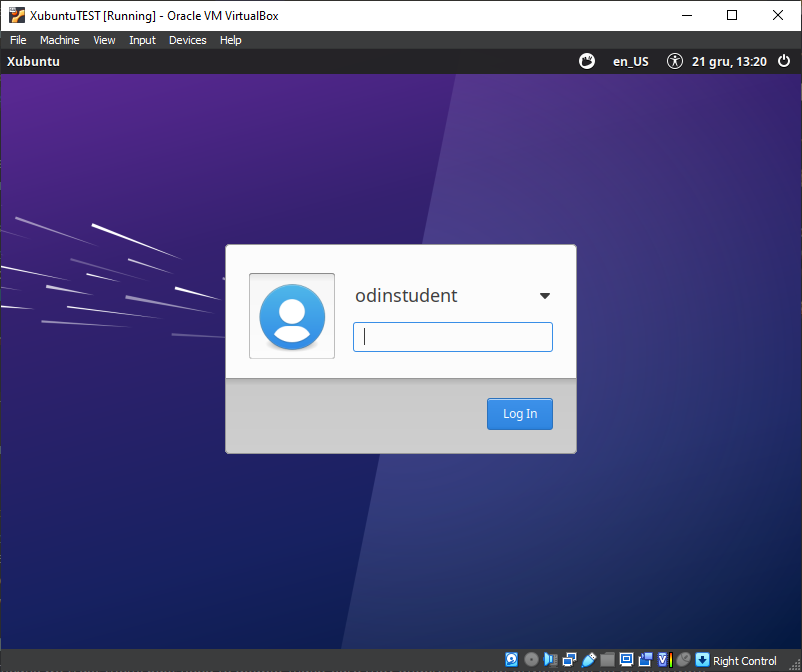
Click Next to be taken to a Summary page, on which you can click Finish to begin the process of unattended installation. The neat thing about it? It installs the OS and GuestAdditions on its own, without your input! Just let it do its own thing, you will know it is finished when you will see a login screen like this one in the Preview section:
Just click the green arrow called Show and you’ll be presented with a VM window and the login screen. Log in with the password you’ve set up during the installation process and we’ll have one bit of configuration left to do.
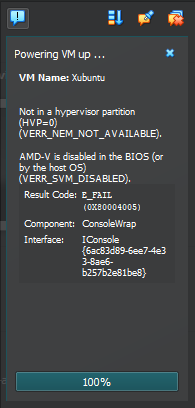
It is possible that you’ll receive an error like this one after clicking Finish:
It means you have to enable virtualization in your computer’s BIOS/UEFI settings. Alternative instructions for enabling virtualization in BIOS/UEFI settings. If you have an AMD CPU, you’re probably looking for something called SVM to enable, for Intel CPUs, Intel Virtualization Technology. The error should tell you what it is looking for. After you deal with it, just Start the machine and let things happen, you’ll know that the process has finished when you see a login screen:
Step 3: Setting correct sudo permissions
Due to how the unattended installation is configured by VirtualBox, your account doesn’t have proper sudo permissions. Think of them as the equivalent to Run as administrator on your Windows machine - you can imagine why it would be important to have them in order.
Step 3.1: Navigate to users and group
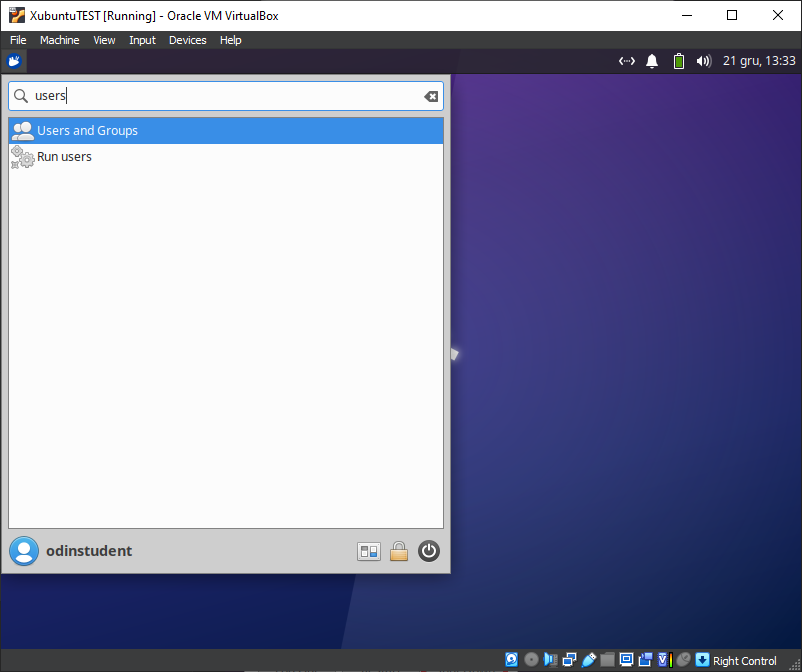
First, if you haven’t already, login with the username and password created earlier, then click on the ![]() in top left of your window, afterwards type in
in top left of your window, afterwards type in Users and you should see Users and Groups show up. Click on it.
Step 3.2: Manage groups
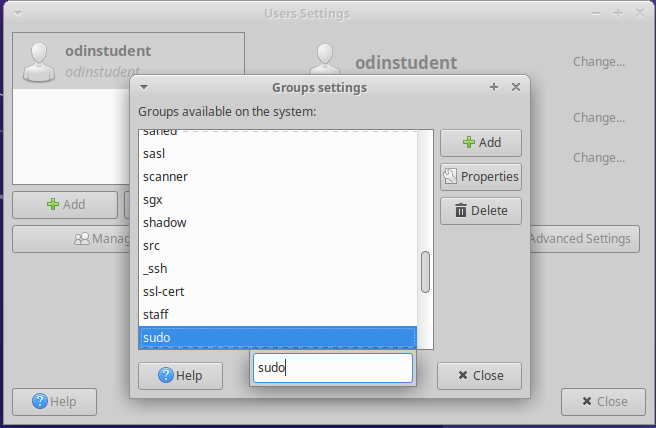
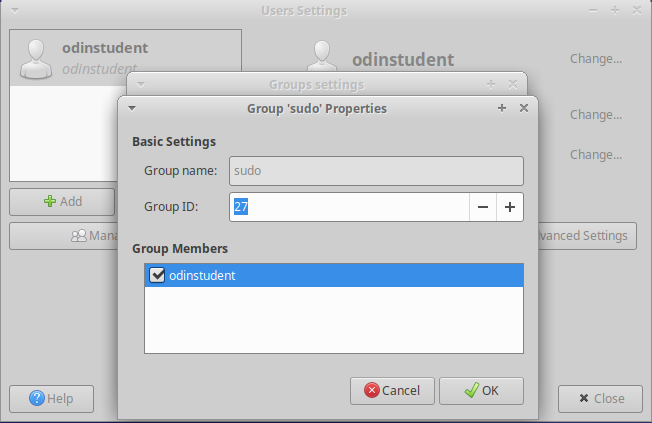
In the window that just came up you want to click on Manage Groups, click somewhere on the list and type sudo on your keyboard. That should bring you to the sudo entry like in the picture:
Step 3.3: Add yourself to sudo
With sudo selected, click Properties and in the window that shows up tick your user’s name like this:
And then click OK. You will be greeted with a password prompt - it’s the same one you logged in with.
Step 3.4: Reboot your VM
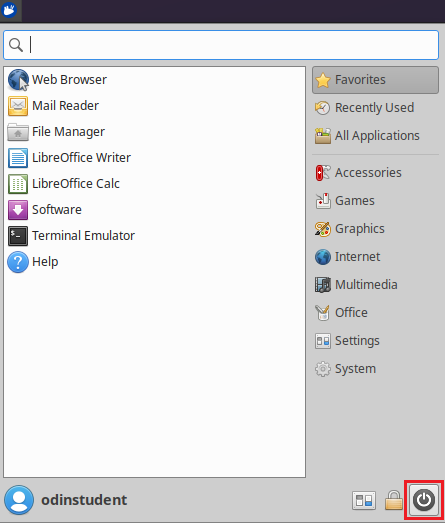
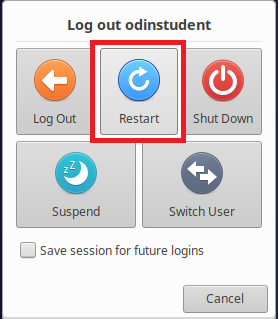
Now that this is all done, you can close those windows and reboot your VM. You can open a Terminal window by doing Ctrl + Alt + T and type in reboot and then press Enter to execute the command. Alternatively, you can click on the ![]() , then click on the power icon in bottom right and pick Restart.
, then click on the power icon in bottom right and pick Restart.
Step 3.5: Test your newly gained sudo privileges
Now that you have access to sudo, we can use this to update our Xubuntu through the Terminal. Open the Terminal and use these commands, one after another:
A note on typing passwords in the terminal
When using a command in the terminal that requires you to enter your password for authentication (such as sudo), you will notice that the characters aren’t visible as you type them. While it might seem like the terminal isn’t responding, don’t worry!
This is a security feature to protect confidential information, like how password fields on websites use asterisks or dots. By not displaying the characters you write, the terminal keeps your password secure.
You can still enter your password as normal and press Enter to submit it.
sudo apt update
sudo apt upgrade
You will be asked for your password after using the first one - type it in and use Enter to provide your terminal with the password. There is no visual feedback about what you’re typing in but you are indeed doing so.
After sudo apt upgrade runs for a while you will be asked whether you want to install things - do so to update your machine. If you have any issues, do not hesitate to come over to our Discord server and ask for help in the #virtualbox-help channel.
Step 4: Understand your new VM
Step 4.1: Close TOP in the Windows browser and open the website in your VM
From now on, stick with The Odin Project (TOP) website within your VM and follow the Linux instructions provided. The curriculum will often require you to copy and paste code between the lesson and your coding space, as well as the terminal. This won’t work smoothly if you switch between the VM and Windows because they are entirely separate environments.
Remember: For the remainder of the TOP curriculum, refer to the Linux instructions only.
Here are some tips to help you get started in a virtual environment:
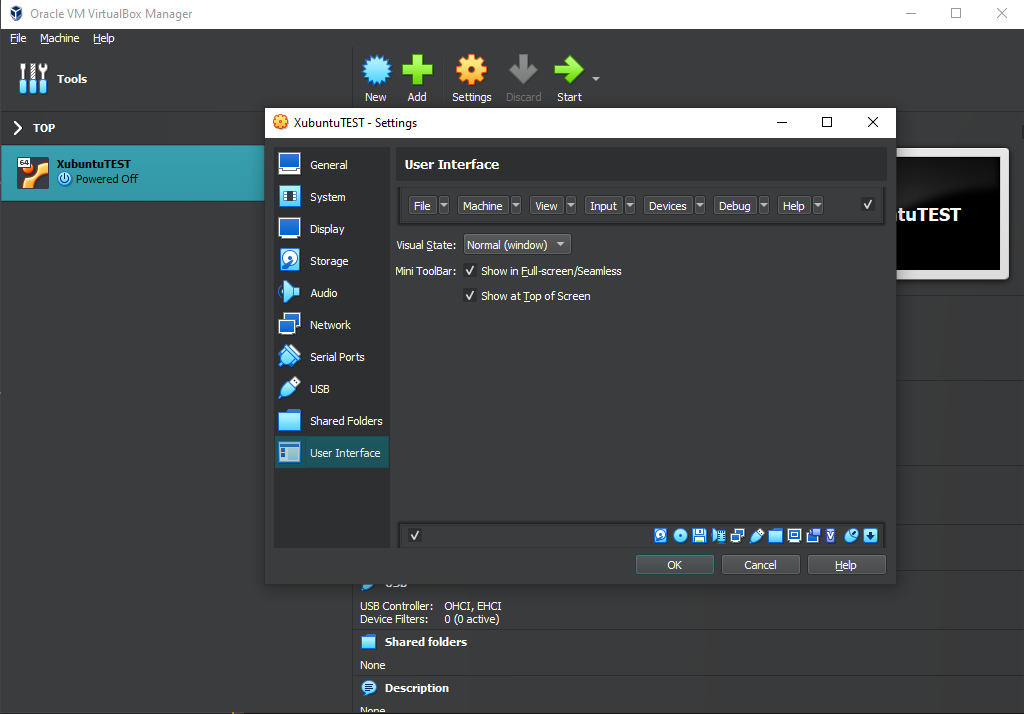
- Enable the toolbar in your VM settings - there are useful options there that you might want to play around with, especially the ones concerning full screen or multiple displays. To do so, click on Settings and then navigate to User Interface and finally tick Show at Top of Screen.
- All your work should happen in the VM. You will install everything you need for coding, including your text editor, language environments and various tools inside the VM. The Xubuntu installation inside of your VM also comes with a web browser pre-installed but we’ll be installing Chrome shortly.
- To install software on your VM, you will follow the Linux (Ubuntu) installation instructions from inside the Xubuntu VM.
- You might need to take screenshots when asking for help on our Discord, here’s how depending on where you use it:
- Inside the VM: you can use Shift + PrtSrc to take screenshots of portion of your screen. Alternatively, you can click the Whisker Menu and type in Screenshot, in which you can choose to take a screenshot of your entire screen, the current window you are on or to select a certain area to capture.
- On your host (Windows): you can use a shortcut of the Host Key (Right Ctrl + E) or click View -> Take Screenshot for a full screenshot. A different way would be unfocusing your VM window by clicking outside of it and then using the regular Windows shortcut of Windows key + Shift + S to take screenshots of portion of your screen.
- Remember: all of the development that you’ll do related to TOP should be done in the VM.
- We recommend going full screen (View -> Full-screen Mode) and forgetting about your host OS (Windows). For best performance, close all programs inside of your host OS when running your VM.
- To add additional monitors, shut down the VM and go to the Display tab in the VirtualBox settings of the VM and increase the monitor count. Now, with the VM running, clicking View -> Virtual Screen 2 -> Enable. You can run fullscreen with multiple monitors, but it may ask for more Video Memory, which you should have increased when adding more monitors. Make sure you enable your Virtual Screens in windowed mode before going fullscreen, otherwise they won’t work. Upon exiting fullscreen, your secondary display may close. You can reopen it with these instructions.
Frequent issues/questions
- If upon trying to start the VM you only get a black screen, close and
power offthe VM, click Settings -> Display in VirtualBox and make sure Enable 3D Acceleration is UNCHECKED, and Video memory is set to AT LEAST 128MB. - Running out of space? Look at these instructions for increasing VM disk space from the TOP Discord server.
-
Are you using a touchscreen? Watch a video on how to enable touchscreen controls for VirtualBox.
- VM performance tips:
- When running the VM, minimize your Windows activity. You probably want to be plugged into power as well if you’re using a laptop.
- Make sure your processors are set to only 2 and the Memory you’ve given your VM is at most half of your total RAM but at least 2GB. If you can’t spare the 2GB, dual boot.
- If videos lag in the VM, make sure to max out Video Memory to whatever you can or alternatively play them on your Windows if your machine can handle it. Disable 3D Acceleration if you have it enabled.
- Do look out for the
 icon in the bottom right of your VM window. This signifies that something called Hyper-V is turned on. A thread on the VirtualBox forums describes how to turn off Hyper-V completely. You want to have the icon of a chip with a V
  icon instead. If you don’t see either of these icons in the bottom right, you have to exit full screen mode to see them.
 - If your performance is still lacking, go for a dual boot as this will make sure you’re using all of your specs for one OS only, thus improving your experience significantly.
- If your scroll wheel behaves oddly in Google Chrome and/or in other applications and you have gone through VM performance tips to make sure your VM is working as intended, look into whether your version of Guest Additions is correct.
Step 5: Safely shutting down your VM
You don’t pull the plug on your everyday use computer, right? Why would you do the same to your virtual computer? When you click the X button and just close out your VM, you might as well say goodbye to your files. In this section, you’ll understand three ways you can shut off your VM.
Option 1 - Shutting down from inside the VM with UI
Clicking on the Whisker Menu ![]() and clicking the power icon will give you several options on how to modify your session, including Shutting Down. Yep, that’s the same place you might’ve used to Restart before!
and clicking the power icon will give you several options on how to modify your session, including Shutting Down. Yep, that’s the same place you might’ve used to Restart before!
Option 2 - Shutting down from inside the VM with the terminal
Typing poweroff inside the terminal will do in this case. Your system will immediately shutdown.
Option 3 - Shutting down from outside the VM
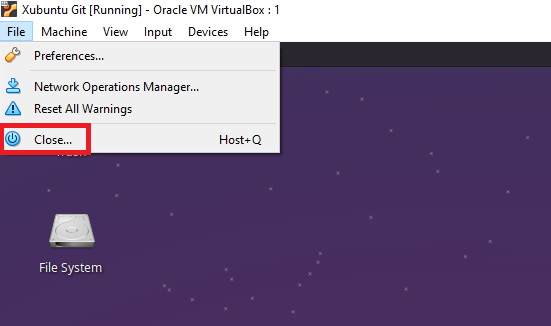
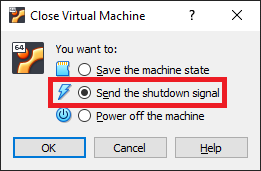
The last way to accomplish this goal of safely shutting down is by using the VM interface. Clicking on the File tab and hitting the close button (which also has a Power Icon) will bring up a popup titled Close Virtual Machine. This popup asks if you want to Save the machine state, Send the shutdown signal, or Power off the machine.
To be safe, click the Send the shutdown signal radio and hit OK. This will safely power down your VM and your files will not get corrupted.
Ubuntu/Windows Dual-Boot
Read this entire section before starting
Dual-booting provides two operating systems on your computer that you can switch between with a simple reboot. One OS will not modify the other unless you explicitly tell it to do so. Before you continue, be sure to back up any important data and to have a way to ask for help. If you get lost, scared, or stuck, we’re here to help in the Odin Tech Support chat room. Come say “Hi”!
Step 1: Download Ubuntu
First, you need to download the version of Ubuntu you want to install on your computer. Ubuntu comes in different versions (“flavors”), but we suggest the standard desktop Ubuntu. If you’re using an older computer, we recommend Xubuntu. Be sure to download the 64-bit version of Ubuntu or Xubuntu. If you reach the download page and are unsure about what version to choose, it is recommended that you pick the Long-Term Support (LTS) version 24.04 (Noble Numbat). You may be tempted to choose a more recent release, but this version is tried and tested by the Odin Project community and therefore the most reliable option for the purposes of this curriculum.
Step 2: Create a bootable flash drive
Next, follow the guide on how to create an Ubuntu Live USB in Windows to create a bootable flash drive so that you can install Ubuntu on your hard drive. If you don’t have a flash drive, you can also use a CD or DVD.
Note: You can use this method to try out different flavors of Ubuntu if you’d like. These images allow you to try out different flavors without committing to an installation. Be aware that running the OS from a flash drive will cause the OS to be slow and can decrease the life of your flash drive.
Step 3: Install Ubuntu
Step 3.1: Boot from the flash drive
First, you need to boot Ubuntu from your flash drive. The exact steps may vary, but in general, you will need to do the following:
- Insert the flash drive into the computer.
- Reboot the computer.
- Select the flash drive as the bootable device instead of the hard drive.
For example, on a Dell computer, you would need to plug in the flash drive, reboot the computer, and press the F12 key while the computer is first booting up to bring up the boot menu. From there, you can select to boot from the flash drive. Your computer may not be exactly the same, but Google can help you figure it out.
Step 3.2: Install Ubuntu
If you would like to test out the version of Ubuntu on the flash drive, click ‘Try me’. When you have found a flavor of Ubuntu you like, click ‘Install’ and continue to the next step.
Installing Ubuntu is where the real changes start happening on your computer. The default settings are mostly perfect, but be sure to “Install Ubuntu alongside Windows” and change the allocated disk space allowed for Ubuntu to 30 GB (or more if you can).
For step-by-step instructions, please follow how to install Ubuntu and dual boot alongside Windows. These instructions are are 22.04 and for Windows 10, but they will get you through the process until we get dedicated dual booting instructions in place.
Intel RST (Rapid Storage Technology)
If you encounter an error requesting you to disable Intel RST while attempting to install Ubuntu, follow this workaround to install Ubuntu with Intel RST systems, specifically Choice #2. The process forces Windows to boot into safemode after you switch your motherboard storage driver to work with Ubuntu. Once it boots into Windows, the forced-on safemode is disabled and you are free to attempt an installation of Ubuntu once again.
ChromeOS/ChromeOS Flex
With the recent addition of being able to run a Linux terminal, the ChromeOS platform has been opened up to the ability to install native Linux applications. If you wish to use your Chromebook to complete The Odin Project, you will need to ensure you meet a couple requirements:
- You have a supported Chromebook:
- You are able to set up Linux on your Chromebook.
Once you have successfully met both of these requirements, you should be able to follow along with the Linux instructions throughout the entire curriculum.
WSL2 (Advanced)
Using WSL2 is a quick and easy way to get started with using Linux, allowing you to run a Linux distribution from within Windows. WSL2 is available on Windows 10 version 2004 and higher (Build 19041 and higher) and Windows 11.
To make it clear: you are going to be using a different OS, this is not a way to avoid using Linux. Due to how WSL2 is integrated with Windows it often causes significant confusion to new learners. Use the Virtual Machine if you want a clear separation between your Windows and Linux so the curriculum is easier to follow.
WSL2 and Linux instructions
Because WSL2 is a full-fledged Linux distribution, almost everything that the curriculum teaches about Linux is also applicable to WSL2. In future lessons, whenever there are instructions that differ by OS, you should follow the Linux instructions, unless the lesson includes WSL2-specific instructions.
Step 1: Installations
Step 1.1: Installing WSL2
- Open PowerShell in administrator mode by searching for it in your applications, right clicking the top option, and then selecting run as administrator. You might get a prompt asking if you want to allow Windows Powershell to make changes to your device: click yes.
-
Enter the following command
wsl --install - After a few minutes you’ll be prompted to reboot your computer; do so.
- You should see an open Powershell window, prompting you to enter a username and a password. Your username should be lowercase, but can otherwise be whatever suits you. You’ll also need to enter a new password.
- When entering your password you might notice that you aren’t seeing any visual feedback. This is a standard security feature in Linux, and will also happen in all future cases where you need to enter a password. Just type your password and hit Enter.
Step 1.2.1: Install Windows Terminal (Windows 10 only)
Windows Terminal is a terminal application that lets you more easily customize and run terminals, as well as supporting multiple tabs which can each run their own different terminals.
- Install Windows Terminal by using the direct install option.
Step 1.2.2: Setting WSL2 as default (Optional)
Unless you are regularly using other terminals on your computer we recommend that you set WSL2 as the default terminal program when you open Windows Terminal.
- Open Windows Terminal by searching for terminal in your applications.
- Click the dropdown next to the new tab button (at the top of the windows), and select Settings.
- You should see a Default Profile option with a dropdown next to it.
- In the dropdown select Ubuntu.
- Click save at the bottom of the page.
Step 2 Opening WSL2
On Windows there are three primary ways to open WSL2.
- If you set Windows Terminal to open a Ubuntu terminal by default you can start a new WSL2 session by opening the terminal app.
- Otherwise you can open Windows Terminal, click the dropdown next to the new tab button (at the top of the windows), and select Ubuntu.
- If you search for Ubuntu in the application search bar you should see a application titled Ubuntu; open it to start a new terminal session.
Terminal color scheme
You might notice when you open WSL2 via Windows Terminal, you’ll see a window with a different color scheme and a different icon compared to opening a terminal through Ubuntu in your applications. This is because Windows Terminal comes with a default color scheme for Ubuntu meant to emulate how a real Ubuntu terminal looks. This difference is purely cosmetic, and there is no practical difference between the two.
/mnt/c is not Linux!
When opening your WSL2 terminal ensure that you do not see /mnt/c at the start of the line. /mnt/c is where your Windows installation lives when working within WSL2, and messing around there can have unintended consequences.
Google Chrome installation
Why Google Chrome?
Because our lessons use Google Chrome, and Chrome/Chromium are overwhelmingly used by developers and consumers, the recommendations we make are very intentional. Look at this usage share of web browsers and see what other folks are using the most.
Choose your Operating System:
Linux
Step 1: Download Google Chrome
- Open your Terminal
- Run the following command to download latest Google Chrome
.debpackage
wget https://dl.google.com/linux/direct/google-chrome-stable_current_amd64.deb
Copy and paste keyboard shortcuts
You have probably noticed that the common keyboard shortcut: Ctrl + V to paste something doesn’t work in the terminal. In order to paste your text input into your terminal you can use: Ctrl + Shift + V keyboard shortcut combination, instead. It is also very handy to know that the: Ctrl + Shift + C keyboard combination will copy any highlighted text from your terminal, which can then be pasted later.
Step 2: Install Google Chrome
-
Enter the following command in your terminal to install Google Chrome
.debpackagesudo apt install ./google-chrome-stable_current_amd64.deb -
Enter your password, if needed
A note on typing passwords in the terminal
When using a command in the terminal that requires you to enter your password for authentication (such as sudo), you will notice that the characters aren’t visible as you type them. While it might seem like the terminal isn’t responding, don’t worry!
This is a security feature to protect confidential information, like how password fields on websites use asterisks or dots. By not displaying the characters you write, the terminal keeps your password secure.
You can still enter your password as normal and press Enter to submit it.
Download is performed unsandboxed
You can ignore any notes saying N: Download is performed unsandboxed (...).
Step 3: Delete the installer file
rm google-chrome-stable_current_amd64.deb
Step 4: Using Google Chrome
You can start chrome in two ways:
- Click Google Chrome from the Applications menu
- Or, use the
google-chromecommand from the terminal
google-chrome
Google Chrome as a background process
Chrome is going to use this terminal to output various messages and won’t let you run other commands. Don’t worry about those messages. If you want to use the same terminal that you run Chrome in for other commands, use google-chrome & instead.
MacOS
Step 1: Download Google Chrome
- Visit Google Chrome download page
- Click Download Chrome for Mac
Step 2: Install Google Chrome
- Open the Downloads folder
- Double click the file googlechrome.dmg
- Drag the Google Chrome icon to the Applications folder icon
Step 3: Delete the installer file
- Open Finder
- Click the arrow next to Google Chrome in the sidebar
- Go to the Downloads folder
- Drag googlechrome.dmg to the trash
Step 4: Using Google Chrome
- Go to your Applications folder
- Double click Google Chrome
WSL2
WSL does not have a graphical user interface (GUI) like Windows, so this step will guide you through installing Google Chrome for Windows instead. Later on, we’ll cover how you can use the Windows installed Chrome to preview your work that lives within WSL.
Step 1: Download Google Chrome
- Visit Google Chrome download page.
- Click Download Chrome.
Step 2: Install Google Chrome
- Open the Downloads folder.
- Double click the file ChromeSetup.exe to start the install.
Step 3: Using Google Chrome
- Search for Google Chrome in your Start Menu.
- Click Google Chrome to start the application.
Optional: Delete the installer file
- Open the Downloads folder.
- Select the ChromeSetup.exe file and hit the Delete key, or drag it the Recycling Bin.
Google Chrome is one of the most important tools that you will be using throughout the curriculum. This reference has many common shortcuts that you may find useful when using Chrome.
Knowledge check
The following questions are an opportunity to reflect on key topics in this lesson. If you can’t answer a question, click on it to review the material, but keep in mind you are not expected to memorize or master this knowledge.
