Introduction
You’re likely somewhat familiar with JSX from previous React lessons, in this lesson we’re going to explain what it is, why we use it, and how to use it in your React apps.
Lesson overview
This section contains a general overview of topics that you will learn in this lesson.
- What JSX is.
- Differences between JSX and HTML.
What is JSX?
JSX is a syntax extension for JavaScript that lets you write HTML-like markup inside a JavaScript file. It’s not required to use JSX when writing React components, but it does make writing them more concise.
Essentially, JSX is syntactic sugar for the React createElement function. This function creates a React element, which is a plain object, so JSX compiles down to plain JavaScript objects.
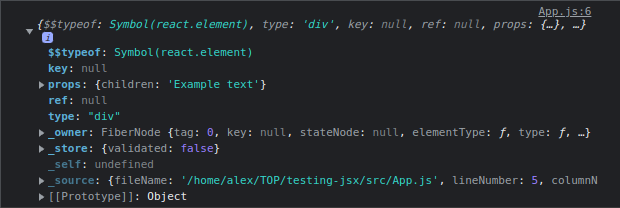
Here you can see the logged value of a div JSX element with some text:
Why do we use JSX?
Most of the time in apps, rendering logic and markup are inherently coupled, but we typically separate them by having our logic and markup in separate files. JSX allows React to separate concerns by containing both rendering logic and content in the same place (a component).
On top of this, it’s a more intuitive, visual way to work with the UI inside your code, and allows React to show more useful error and warning messages.
Rules of JSX
If you were to take some valid HTML and copy it straight into your React component, it would not work. This is due to some of the rules JSX implements, that aren’t present in HTML.
-
Return a single root element.
If you wish to return multiple elements in a component, you can do so by wrapping them in a parent tag. This can be a
<div>, or, if you don’t want the elements to have a container, you could use a React fragment, like so:<>Children</>Correct:
function App() {
  // Could replace <></> with <div></div>
  return (
    <>
      <h1>Example h1</h1>
      <h2>Example h2</h2>
    </>
  );
}
Incorrect:
function App() { return ( <h1>Example h1</h1> <h2>Example h2</h2> ); } -
Close all tags.
In HTML, many tags are self-closing and self-wrapping. In JSX however, we must explicitly close and wrap these tags.
<input>would become<input />, and<li>would become<li></li>Correct:
function App() {
  return (
    <>
      <input />
      <li></li>
    </>
  );
 }
Incorrect:
function App() { return ( <> <input> <li> </> ); } -
camelCase Most things.
JSX turns into JavaScript, and attributes of elements become keys of JavaScript objects, so you can’t use dashes or reserved words such as
class. Because of this, many HTML attributes are written in camelCase. Instead ofstroke-width, you’d usestrokeWidth, and instead ofclassyou’d useclassName.Correct:
function App() {
  return (
  <div className="container">
    <svg>
      <circle cx="25" cy="75" r="20" stroke="green" strokeWidth="2" />
    </svg>
  </div>
  );
}
Incorrect:
function App() {
  return (
    <div class="container">
      <svg>
        <circle cx="25" cy="75" r="20" stroke="green" stroke-width="2" />
      </svg>
    </div>
  );
}
Converting HTML to JSX
Now that we’ve covered the Rules of JSX, we’ll go through the conversion of a chunk of HTML to JSX.
<h1>Test title</h1>
<svg>
  <circle cx="25" cy="75" r="20" stroke="green" stroke-width="2" />
</svg>
<form>
  <input type="text">
</form>
If you try to return this from a React component, you would get many errors, so we are going to fix that!
Make sure to follow along with this example in your local environment. Alternatively, you can go to react.new to have a quick React environment up and going in your web browser.
The first issue we get is that this would not return a single root element, so let’s give it a container.
<div>
  <h1>Test title</h1>
  <svg>
    <circle cx="25" cy="75" r="20" stroke="green" stroke-width="2" />
  </svg>
  <form>
    <input type="text">
  </form>
</div>
You should see that another error appears now that we’ve fixed the initial one. This doesn’t mean we created the error with our previous changes, just that React wasn’t showing this one yet.
Now, onto the second issue, which is that we haven’t closed the <input> tag.
<div>
  <h1>Test title</h1>
  <svg>
    <circle cx="25" cy="75" r="20" stroke="green" stroke-width="2" />
  </svg>
  <form>
    <input type="text" />
  </form>
</div>
If you are following along, at this point you will stop seeing an error being rendered on-screen, this time it will be in the console.
The last issue is that we haven’t camelCased our attributes, and so are using invalid DOM properties for JSX, specifically the stroke-width.
<div>
  <h1>Test title</h1>
  <svg>
    <circle cx="25" cy="75" r="20" stroke="green" strokeWidth="2" />
  </svg>
  <form>
    <input type="text" />
  </form>
</div>
Now that we’ve applied all of the fixes to the errors that React gave us, this is fully fledged JSX code that can be used in a React component without any issues.
Assignment
In the following lessons, you will spend some time reading the React documentation. Most of them will have small tasks at the end to test what you have read. We will not mention them explicitly each time, but be sure to do them. Practice makes perfect!
-
Read through the React docs Writing Markup with JSX page to review the content we have covered here.
-
Read through the React docs JavaScript in JSX page to introduce yourself to writing JavaScript logic and referencing dynamic values inside of your markup.
Knowledge check
The following questions are an opportunity to reflect on key topics in this lesson. If you can’t answer a question, click on it to review the material, but keep in mind you are not expected to memorize or master this knowledge.